Hmmm, Pie?
Is it to early for pie? I think not!
I have a whole lotta pie for you this week. It started with a piece of Pumpkin pie...and well if I am being honest, I really do not like pumpkin pie what-so-ever! So, I thought I would make myself an apple pie...and then that turned into cherry...and then that into pecan...and well before I knew it I was staring down EIGHT fabulous pieces of pie!
Some times you just have to run with it, right!? :)
Of course, my beautiful teenage daughter wonders why I didn't just hit the kitchen to make the real deal...only thing I could come up with is that these are much healthier and let's face it...these will last SO MUCH longer! lol

All of these fit together to form a large pie of eight...of course, you can make an entire pie out of one slice file...but really, where is the fun in that! These boxes are perfect for holding pie slices to-go! What guest wouldn't be impressed with their own decorative box for that beautiful piece of pie? These are also great for holding favors, small gifts, or just as home decor! Each box measures approximately 4-1/2" x 3-1/2" x 2-1/8" and each has its own uniquely delicious decorations!
All of these files go together similarly. If you have a specific question about a file, just shoot me an email (jamielanedesigns@gmail.com) or leave a comment here with your email address and I will try to help!
Here is the tutorial:

1. Cut all the pieces that are with the file and fold on all the score lines. Place adhesive on the small tab and long tab of the pie base as shown in the image. Ink around the edges of all the pieces if desired.
2. Adhere the small tab to the other side piece to form a triangle.
3. Next push down the top triangle and adhere the long tab.
4. Fold in the three remaining tabs and close the box. If you are not opening these for pie or favors you can glue the tabs. I left all mine so that I could open and close the boxes.
5. Grab the main crust piece and place adhesive on the area under the score line.
6. Fold the top edge back and adhere it to the back of the pie.
7. Next adhere the edge crust pieces on both sides of the box as shown.
8. Adhere the sentiment to the center.
9. Adhere a ribbon on the left edge of the box and then adhere the leaf pieces to the center of the bow.
10. This is an image of the box open.
The Apple Pie and Lemon Meringue Pie both have swirly puffs on them so I wanted to show you how those go together as well...
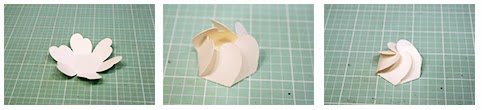
1. Fold on on the score lines.
2. Push each swirl in toward the center. When you reach the last one, pull up the first swirl (the one you started with) and tuck the small bubble piece under it.
3. You will have to push the pieces down and the base will bend out slightly to form the "puff".
And here are the pie pieces:
Pumpkin Pie:

Apple Pie:

Cherry Pie:

Chocolate Cream Pie:

Coconut Cream Pie:

Lemon Meringue Pie:

Pecan Pie:

Strawberry Pie:

Hungry yet? :)
They ARE calorie free...so feel free to grab one of each!
Tags:
3D
Apple Pie
Cherry Pie
Chocolate Cream Pie
Coconut Cream Pie
Jamie Cripps
Jamie Lane Designs
Lemon Meringue Pie
Pecan Pie
Pie
Pie Boxes
Pumpkin Pie
Silhouette
Strawberry Pie
Tutorial


1 comments